Installation!!
- sawa kurotani
- Jun 18, 2023
- 3 min read
Updated: Jul 4, 2023
WATER FEATURE CHALLENGE - 5
In any project, installation is one of the most exciting and complicated steps. However, because of my modular design, and because I took the time to prepare all the components ahead of time, actual installation took only about an hour - sort of anti-climactic.
Only thing left to do was to cut the landscape cloth into a 20" diameter round shape and cut a slit on one side. Once that was done, I placed the large planter pot in the right position and made sure it was level. It's very important to do this at this stage (it'll be very awkward to move once the fountain is fully assembled).
I placed the stacked plastic planter pots inside the large planter upside down, threaded the tubing (which was attached to the small planter in the pre-installation stage) through one of the holes on the plastic disc, and cut the tubing to length, with a little extra slack, to make sure the water pump would sit on the bottom of the large pot. I attached the water pump on the other end, using a bit of silicone tape to secure the joint.
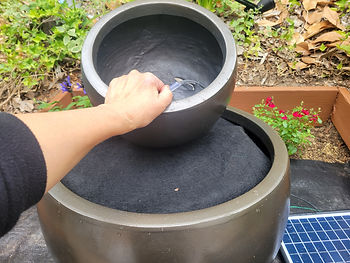
To assemble, I dropped the water pump to the bottom of the large planter and placed the plastic disc on top of the overturned plastic planter pots. I set the small planter on top of that for the moment and slipped the landscape cloth underneath. When I poured a few gallons of water into the large planter, the water pump kicked in and water started coming out of the tube inside the small pot!
Now, I have to say this step was a little tricky to get through, because the small planter, plastic disc and water pump were all strung together with the tubing. It'll be easier if you have a second set of hands, but one person can do it with a little patience. A little tip: though not in the photograph, I had a lidded 5 gallon bucket right next to the large pot so I could set the small planter on it while I adjusted all the parts inside the large planter.
Now it was time to bring out the rocks and arrange them around the small pot, which would sit in a tilted position. I combined pea gravel and medium-sized pebbles, but it all depends on what kind of look you'd like.
One of the concerns I had was whether the planter on the top would stay in this tilted angle. After playing with rocks for a while, I was happy enough with its stability. Rocks and water inside the pot seem to weigh it down securely enough for me, because my fountain is set back in the part of the backyard where there was no chance of people bumping into it. I'd be more careful, though, if it was in a high traffic area. I might even consider using a bit of silicone or cement to secure the top planter.
Once I laid down white gravel and some rocks around the fountain, the installation was complete. Notice the water, which was muddy during the installation, cleared up after a few minutes of running the fountain.

What do you think - looks pretty good, right? I was pretty excited about how it all came together, but didn't quite know what to do about the tubing end. The water pump came with a bunch of attachments, but they were intended to be attached directly onto the pump, not at the end of the tubing. As photographed above, I attached a straight spout, made of black plastic, at the end of the tubing. Because it is rigid, it stood higher than the tubing alone, and it was also easier to secure with rocks around it. But it still didn't look, eh, "finished" to me. Hmmm, what to do???
Find out what I ended up doing with the spout and other tweaking in my concluding blog!
Comentários